The electrical system is the backbone of any modern motorcycle, and the charging system is a crucial component within it. For Harley Davidson motorcycles, a reliable charging system ensures your battery remains properly charged, providing the necessary power for starting, running the lights, and powering all the electrical accessories. Central to understanding and maintaining this system is the harley davidson charging system wiring diagram. This diagram is not just a complex map of wires; it’s a visual representation of how electricity flows within the charging system, allowing you to diagnose problems, perform repairs, and ensure your Harley stays on the road.
The importance of understanding the harley davidson charging system wiring diagram cannot be overstated. Without it, troubleshooting electrical issues can quickly become a frustrating and time-consuming process. A wiring diagram provides a clear and concise overview of the circuit, showing how the stator, voltage regulator, battery, and other components are connected. This knowledge can prevent costly mistakes and ensure that any modifications or repairs are carried out correctly. Properly diagnosing electrical issues using the wiring diagram can also help prevent further damage to other components in the electrical system.
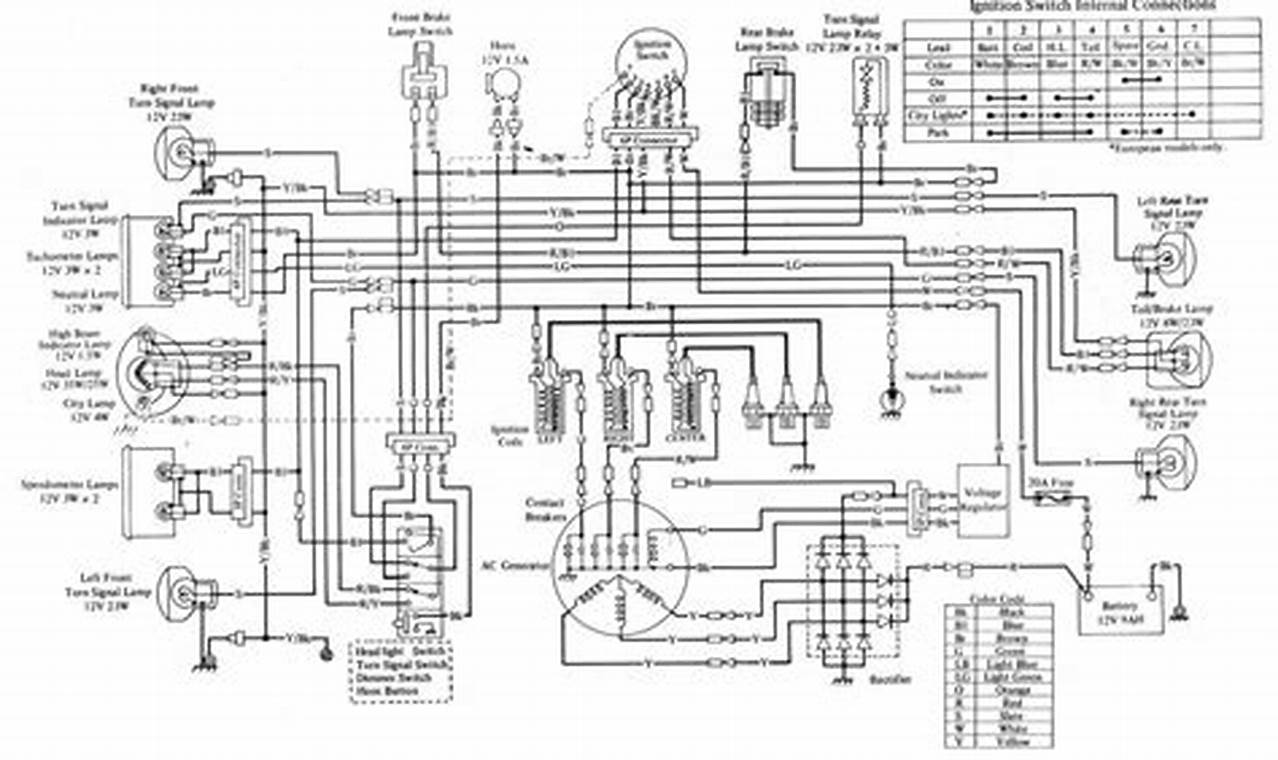
A typical harley davidson charging system wiring diagram will include several key elements. It shows the individual wires, their colors, and their connections to different components. Symbols are used to represent these components, such as the battery, stator, voltage regulator, rectifier, and fuses. Lines indicate the wiring paths, and often, there are specific notes or labels indicating wire gauge, voltage levels, or other critical information. The diagram typically provides a simplified yet comprehensive representation of the charging system, making it easier to follow the flow of electricity and identify potential problem areas.
Learning to read a harley davidson charging system wiring diagram involves understanding the symbols and conventions used. Each symbol represents a specific component, and the lines connecting them indicate the wiring. Wire colors are crucial for tracing circuits and verifying connections. When reading the diagram, start by identifying the main components and tracing the path of electricity from the stator to the voltage regulator, then to the battery. Pay attention to the labels and notes, as they often contain valuable information about the circuit. Practice following different paths within the diagram to become comfortable with how the system is connected.
When working with your Harley Davidson’s charging system, several tips can help ensure a successful outcome. Always disconnect the battery before working on any electrical component to prevent short circuits. Use a multimeter to test voltage and continuity to verify the wiring and components are functioning correctly. Refer to your Harley Davidson service manual for specific instructions and torque specifications. If you are not comfortable working with electrical systems, it is always best to consult with a qualified motorcycle mechanic. Also, be sure to use the correct gauge of wire when making any repairs or modifications to maintain circuit integrity.
In conclusion, the harley davidson charging system wiring diagram is an invaluable tool for any Harley Davidson owner or mechanic. Understanding how to read and interpret this diagram empowers you to diagnose electrical problems, perform necessary repairs, and ensure the reliable operation of your motorcycle’s charging system. By familiarizing yourself with the symbols, conventions, and basic principles of electrical circuits, you can confidently tackle electrical challenges and keep your Harley Davidson running smoothly for years to come. Remember, safety should always be your top priority, and if you’re unsure about any electrical work, seek the help of a professional.
