The Lippert leveling system is a sophisticated component in many RVs and trailers, providing automated or semi-automated leveling capabilities for enhanced stability and convenience. At the heart of this system is a complex network of electrical wiring that connects the control panel, hydraulic pump, sensors, and leveling jacks. Understanding the lippert leveling system wiring diagram is crucial for troubleshooting issues, performing maintenance, and ensuring the system operates reliably. A clear wiring diagram is your roadmap to the system’s electrical architecture.
Importance of Accurate Wiring
Correct wiring is paramount for the Lippert leveling system’s proper function. Miswiring can lead to a variety of problems, ranging from minor inconveniences to significant damage. For instance, incorrect wiring might cause the system to malfunction, fail to level properly, or even damage electrical components, potentially resulting in costly repairs. A meticulous approach to wiring, guided by the lippert leveling system wiring diagram, minimizes the risk of errors and maximizes the lifespan and efficiency of the system. The integrity of the entire leveling system depends on secure and proper electrical connections.
Key Benefits of Using a Wiring Diagram
Leveraging a Lippert leveling system wiring diagram offers several tangible benefits. Firstly, it simplifies troubleshooting. When a problem arises, the diagram allows you to trace the circuit, identify potential faults, and pinpoint the source of the issue. Secondly, it aids in component replacement. If a sensor, motor, or control panel needs replacing, the diagram ensures correct connections are made. Thirdly, it can be invaluable for upgrades or modifications to the system. Whether you’re adding new features or integrating other electrical systems, a clear wiring diagram provides a solid foundation for safe and effective integration. Accurate and readily available diagrams save time, money, and frustration.
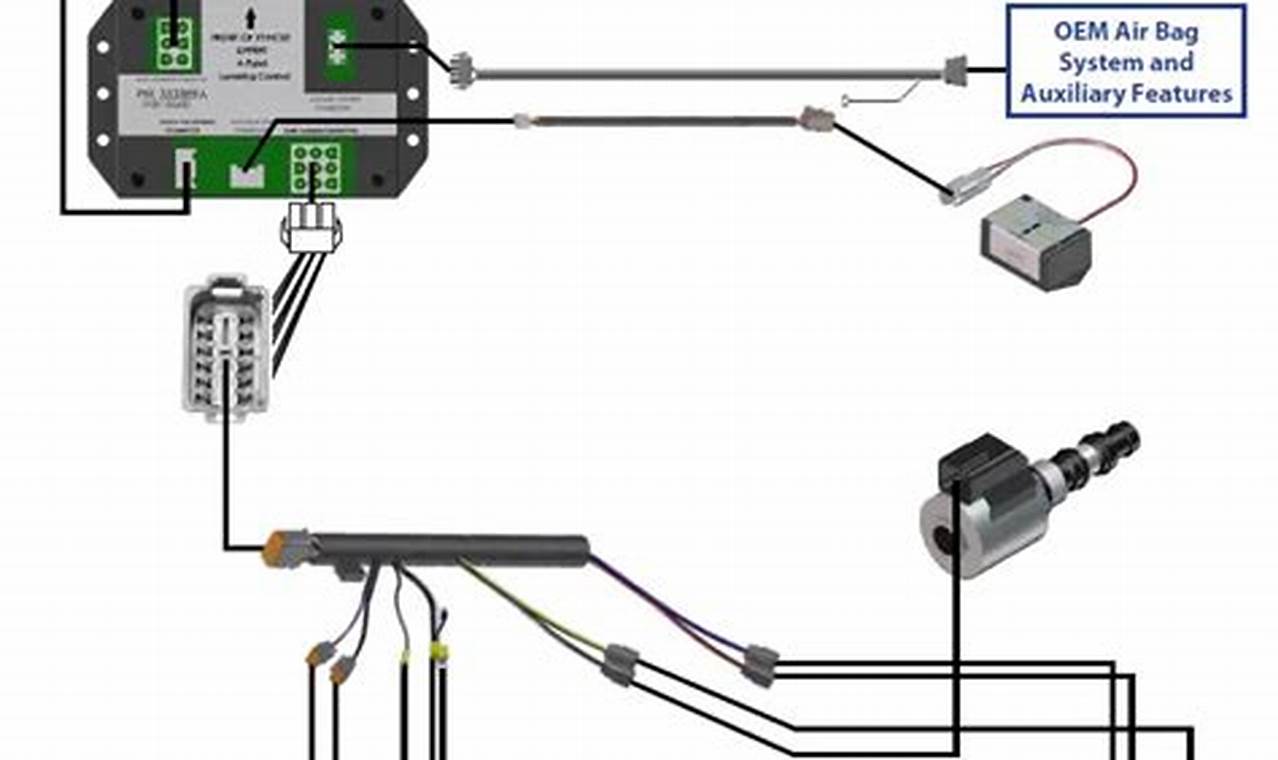
Structure of a Lippert Leveling System Wiring Diagram
A typical Lippert leveling system wiring diagram will include several key elements. It will show the locations of all components, such as the control panel, hydraulic pump, sensors (typically located on the axles), and leveling jacks. It will also detail the wiring connections between these components, including wire colors, gauges, and connector types. The diagram uses standardized symbols to represent each component and connection, making it universally understandable. Grounding points are clearly indicated, and the diagram may also include voltage and current specifications for various circuits. Often, there are different diagrams depending on the model of Lippert leveling system being used.
How to Read a Wiring Diagram
Reading a lippert leveling system wiring diagram requires a systematic approach. Start by identifying the main components and their corresponding symbols on the diagram. Next, trace the wires between the components, paying close attention to wire colors and markings. Understand the function of each circuit and how it relates to the overall system operation. Use a multimeter to verify voltage and continuity at various points in the circuit, as specified in the diagram. Refer to the diagram’s legend for definitions of symbols and abbreviations. Practice and familiarity will make it easier to interpret these diagrams accurately.
Additional Tips and Considerations
Always disconnect the power source before working on any electrical components of the Lippert leveling system. Use appropriately sized wiring and connectors for any repairs or modifications. Double-check all connections to ensure they are secure and properly insulated. Consider taking pictures or making notes of wire locations before disconnecting them, as this can simplify reassembly. If you’re uncomfortable working with electrical systems, it’s always best to consult with a qualified RV technician. Keep a copy of your lippert leveling system wiring diagram handy for future reference, as it is a valuable resource for maintaining and troubleshooting your leveling system. A proactive approach ensures that your system remains in good working order, and that you can continue to enjoy its benefits for years to come.
