For any owner or mechanic working on a 1996 Lincoln Town Car, the 1996 Lincoln Town Car wiring diagram is an absolutely essential tool. This document is a detailed visual representation of the vehicle’s entire electrical system. It outlines the connections, components, and pathways of every wire and circuit within the car. Without it, diagnosing electrical issues and performing repairs can be incredibly difficult and potentially lead to further damage.
The key benefits of utilizing the 1996 Lincoln Town Car wiring diagram are numerous. Firstly, it greatly reduces troubleshooting time. Instead of tracing wires manually, the diagram provides a clear roadmap to identify faulty components or breaks in the circuit. Secondly, it minimizes the risk of incorrect wiring during repairs or modifications. Connecting wires improperly can lead to short circuits, blown fuses, or even damage to sensitive electronic control units. Finally, it empowers both professional mechanics and DIY enthusiasts to confidently tackle electrical repairs, saving time and money on potentially costly shop visits.
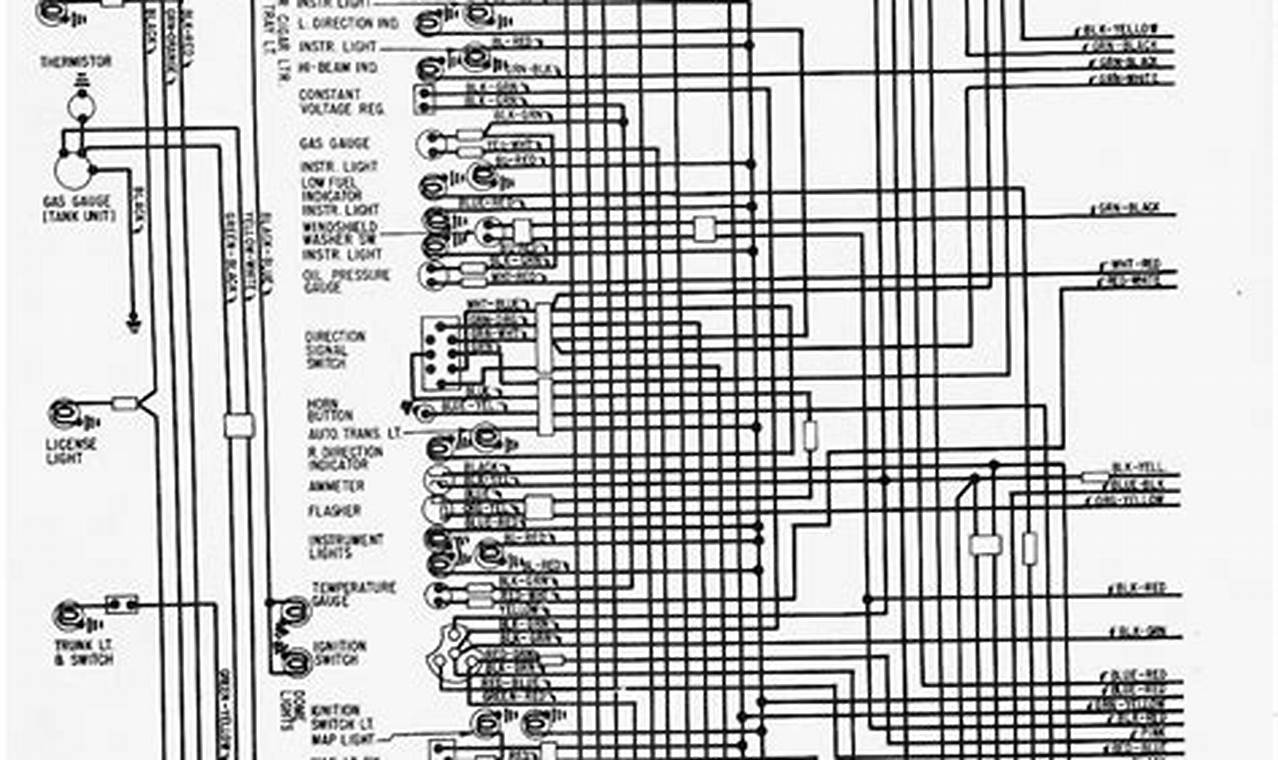
The 1996 Lincoln Town Car wiring diagram is structured in a logical manner, typically organized by system. You’ll find sections dedicated to the starting system, charging system, lighting system, ignition system, and so on. Each circuit is represented by lines connecting various symbols. These symbols represent different electrical components, such as fuses, relays, switches, motors, and sensors. Wires are color-coded, and the diagram includes a legend explaining what each color signifies. Knowing the color code and the symbols used is crucial for understanding the flow of electricity within the car.
Learning how to read a 1996 Lincoln Town Car wiring diagram involves a few key steps. First, familiarize yourself with the symbols used to represent different components. Many diagrams include a key or legend that identifies each symbol. Second, pay close attention to the color codes used for the wires. These codes help you trace wires accurately throughout the system. Third, start by identifying the circuit you are interested in. For example, if you are troubleshooting a faulty headlight, locate the section of the diagram related to the lighting system and trace the circuit from the power source to the headlight. Finally, use a multimeter to test for continuity, voltage, and resistance at various points in the circuit to pinpoint the location of the problem.
Beyond the basic understanding of symbols and color codes, here are a few additional tips for working with 1996 Lincoln Town Car wiring diagrams. Always disconnect the battery before working on any electrical system to prevent accidental shorts or shocks. Use a high-quality wiring diagram specific to your vehicle’s year and trim level; incorrect diagrams can lead to misdiagnosis. When tracing circuits, use a highlighter to mark the wires you’ve already checked to avoid confusion. If you are unsure about any part of the diagram or the repair process, consult a qualified mechanic or refer to a repair manual for further guidance.
In conclusion, the 1996 Lincoln Town Car wiring diagram is an invaluable resource for anyone working on the electrical system of this vehicle. Understanding its structure, symbols, and color codes empowers you to diagnose and repair electrical issues efficiently and safely. By taking the time to learn how to read and interpret this diagram, you can save time, money, and frustration, ensuring the continued reliable operation of your 1996 Lincoln Town Car.
